Linux Server Backup with Duplicati & Backblaze B2

Why another tutorial?
This tutorial aims to collect the best practices for setting up a Linux cloud backup solution and provides the reasoning behind them. This sets it apart from resources like the official Backblaze B2 Duplicati integration tutorial, which overlooks many small yet time-consuming details and fails to explain the rationale for certain recommendations that might be crucial for your data's security and ease of use.
Why Duplicati?
There are many backup solutions out there, but they're either paid, limited in some way, or lack a proper UI. After many years of experimenting with apps like JungleDisk, MSP360, duplicity, Duplicacy, Duplicati, and others, I can say that among the paid ones, I really like Duplicacy, and among true open-source solutions, it's Duplicati (MIT license), which covers the basics quite well:
- Runs on Windows, macOS, and Linux (written in C#)
- Easy-to-use web-based UI (or CLI if you prefer)
- Incremental backups and data deduplication
- User-end AES-256 encryption
- Supports dozens of backends (FTP, SSH, Backblaze B2, Storj, Microsoft OneDrive, Amazon S3, Google Drive, box.com, Mega, and many others)
- Custom schedules
- Auto-updater
Why Backblaze B2?
If the main criteria for a storage provider are to be reliable and affordable, and we all know that Amazon S3 and Google Cloud Storage are quite overpriced, we should narrow our search to companies like Wasabi and Backblaze, which specialize solely in data storage. Regarding their durability - according to Backblaze: "The Backblaze Vault architecture calculates at 99.999999999% (11 x 9s) annual durability." and so with Wasabi: "Wasabi is designed to provide eleven nines (99.999999999%) durability of objects over a given year.". At the time of writing this tutorial, Backblaze costs $6 per TB/month, compared to $6.99 per TB/month for Wasabi, so we will stick with the former.
Setup Backblaze
-
Create a Backblaze account, if you don't already have one.
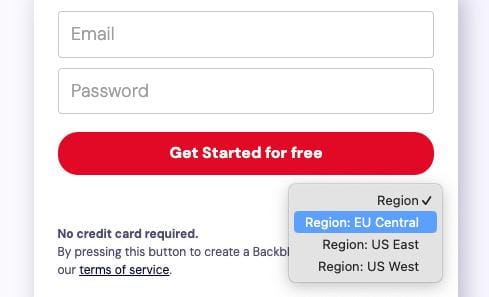 ⚠️Choose your region wisely, as it can't be changed later! E.g., if you live in the EU, you might want to choose the EU region as shown on the screenshot for better compliance with the GDPR and the EU data regulations.
 -
Add your credit card details.
-
Create a new bucket and put a meaningful name, leaving all other options as they are.
I usually name my buckets:[customer]-[servername]-backup. So if the server is owned by Acme Inc. and the server name isnl-1.srv.example.net- the bucket name will becomeacme-nl1srvexamplenet-backup. This helps to orient and avoids colliding with other bucket names on services where they have to be unique. However, this is highly opinionated, so feel free to name your bucket according to your own preferences.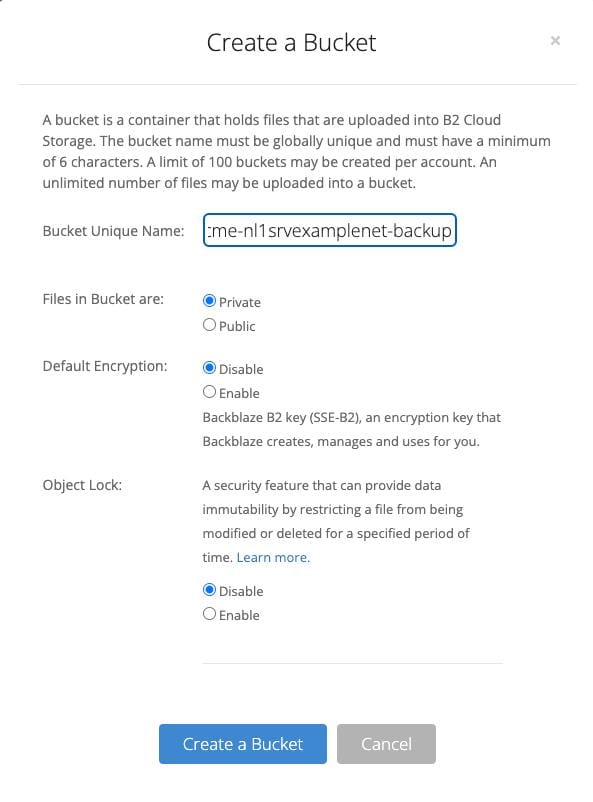
-
Create a new application key and allow access to the bucket you created
I would name it, following this structure:[customer]-[servername]-backup-key.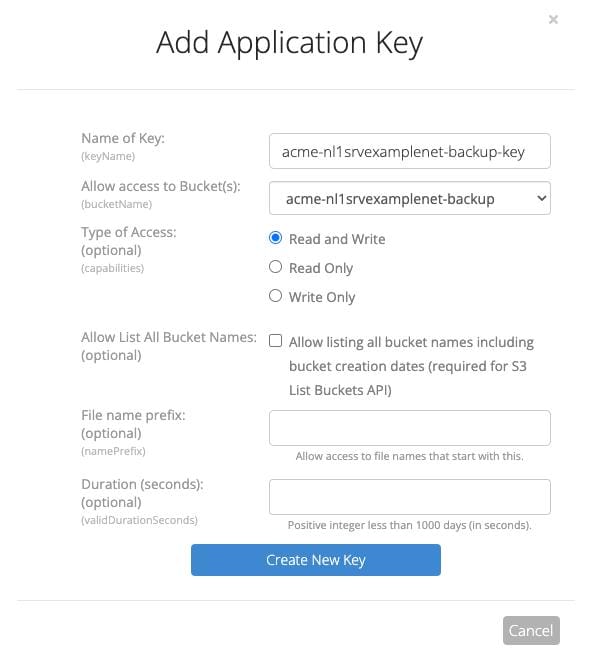
-
Copy your newly created application key's
keyIDandapplicationKeyas we'll need them later.
Setup mysqlbackup.sh
This script allows you to easily revert any database from a SQL dump for each of the past 30 days even without using Duplicati. Or if using it, you'll have almost daily database backups even for the months which have only one backup. The assumption is that you have quite a small database size. If not, feel free to decrease the RETENTION_DAYS to a smaller value, even 1, as previous days would be backed up with Duplicati.
-
Populate
/root/.my.cnfwith your MySQL root username and password:[client] user=root password=YourRootPassword -
Restrict access
chmod og= /root/.my.cnf -
Create the scripts directory
sudo mkdir /root/scripts -
Create and populate
/root/scripts/mysqlbackup.sh:#!/bin/sh # # MySQL Backup Script # # Copyright (c) 2023-2024 Grigor Yosifov <grigor@grigor.com> # # Permission is hereby granted, free of charge, to any person obtaining a copy # of this software and associated documentation files (the "Software"), to deal # in the Software without restriction, including without limitation the rights # to use, copy, modify, merge, publish, distribute, sublicense, and/or sell # copies of the Software, and to permit persons to whom the Software is # furnished to do so, subject to the following conditions: # # The above copyright notice and this permission notice shall be included in all # copies or substantial portions of the Software. # # THE SOFTWARE IS PROVIDED "AS IS", WITHOUT WARRANTY OF ANY KIND, EXPRESS OR # IMPLIED, INCLUDING BUT NOT LIMITED TO THE WARRANTIES OF MERCHANTABILITY, # FITNESS FOR A PARTICULAR PURPOSE AND NONINFRINGEMENT. IN NO EVENT SHALL THE # AUTHORS OR COPYRIGHT HOLDERS BE LIABLE FOR ANY CLAIM, DAMAGES OR OTHER # LIABILITY, WHETHER IN AN ACTION OF CONTRACT, TORT OR OTHERWISE, ARISING FROM, # OUT OF OR IN CONNECTION WITH THE SOFTWARE OR THE USE OR OTHER DEALINGS IN THE # SOFTWARE. # USAGE: # To set up a daily cronjob for this script: # 1. Run `crontab -e` to edit the cron jobs. # 2. Add the following line: # 13 0 * * * /root/scripts/mysqlbackup.sh # This schedules the script to run daily at 00:13. # Script Configuration RETENTION_DAYS=30 BACKUP_DIR="/root/backups/mysql" MYSQL_HOST="localhost" ### Paths ### DATE=$(date +"%Y-%m-%d") MYSQL_PATH="$(which mysql)" MYSQLDUMP_PATH="$(which mysqldump)" BZIP_PATH="$(which bzip2)" mkdir -p "$BACKUP_DIR" ### Start MySQL Backup ### DATABASES="$($MYSQL_PATH -h $MYSQL_HOST -Bse 'show databases')" for db in $DATABASES; do if [ "$db" != "information_schema" ] && [ "$db" != "performance_schema" ]; then BACKUP_FILE="${BACKUP_DIR}/${DATE}-${db}.sql.bz2" $MYSQLDUMP_PATH --single-transaction --skip-lock-tables -h $MYSQL_HOST $db | $BZIP_PATH > "$BACKUP_FILE" # Keep only the latest RETENTION_DAYS backups and delete the rest ls "${BACKUP_DIR}"/*"-${db}.sql.bz2" | sort -r | tail -n +$((RETENTION_DAYS + 1)) | xargs rm -f fi done -
Make it executable:
chmod +x /root/scripts/mysqlbackup.sh -
Verify that it works, executing:
/root/scripts/mysqlbackup.shand check whether backup files were successfully created:ls -l /root/backups/mysql/ -
Set up a daily cronjob for this script:
-
Run
crontab -eto edit the cron jobs. -
Add the following line:
15 0 * * * /root/scripts/mysqlbackup.shTo schedule the script to run daily at 00:15.
-
-
Create an empty file
/root/.forwardand add your email address to receive any errors for the root user.- Test if it works:
echo test | sendmail root - If it doesn't, check mail logs for more information:
tail -100 /var/log/mail.log
- Test if it works:
Setup Duplicati
-
If you don't have the latest version of Mono, install it as per the instructions for your Linux distribution (e.g.
sudo apt install mono-complete) or from the official Mono download page
Important: Make sure to install the "mono-complete" package to avoid certain warnings and error messages in Duplicati that might otherwise appear days or weeks after you start using it. -
Download and install the latest version of Duplicati for Linux as described in the Duplicati 2 User's Manual but before you start the service (last step), configure an SSL certificate as follows, as otherwise, the unencrypted keys for your backup cloud storage and your encryption keys will be transferred in plain text over the internet!
There are two ways to configure an SSL certificate, where the first one is the preferred way:-
(if you have a web server) A valid SSL through a reverse proxy for nginx or Apache
This is preferred, because you can easily configure LetsEncrypt and additional security through the web server, like HTTP auth, IP whitelist, etc.-
Assuming you have a running web server with a valid SSL on your hostname (if you don't – check Certbot as this is the recommended by Let's Encrypt way for easy SSL setup on any web server):
- (for nginx) Add this to the SSL-enabled server configuration block:
server {
		listen 443 ssl;
        #...

        # Duplicati: redirect /duplicati to /duplicati/
        location /duplicati {
                return 301 $scheme://$host/duplicati/;
        }
        # Duplicati: reverse proxy
        location ^~ /duplicati/ {
                proxy_pass http://127.0.0.1:8200;
                proxy_redirect / /duplicati/;
                rewrite /duplicati(.*) $1 break;
        }
        #...
}
Restart nginx.
- (for Apache 2) Add this to the SSL-enabled virtual host configuration:
<VirtualHost *:443>
	#...

	# Duplicati: redirects /duplicati to /duplicati/
	RewriteEngine On
	RewriteRule ^/duplicati$ https://%{HTTP_HOST}/duplicati/ [R=301,L]
	# Duplicati: allows restore to work through the reverse proxy
	AllowEncodedSlashes On

	# Duplicati: reverse proxy
	<Location /duplicati/>
		ProxyPass http://127.0.0.1:8200/
		ProxyPassReverse http://127.0.0.1:8200/
		ProxyPreserveHost On
		Order allow,deny
		Allow from all
	</Location>
	#...
</VirtualHost>
Restart apache2.
-
Open
/etc/default/duplicatiand replace the entire line ofDAEMON_OPTS=…withDAEMON_OPTS=" --webservice-allowed-hostnames=nl-1.srv.example.net"Replace
nl-1.srv.example.netwith your server hostname.
-
-
(if you don't have a web server) A self-signed SSL certificate directly through the Duplicati configuration
-
Generate the SSL certificate:
sudo sh -c 'mkdir -p /root/.config/Duplicati/ssl && chmod -R og= /root/.config/Duplicati' # Replace "nl-1.srv.example.net" with your server hostname sudo openssl req -x509 -newkey rsa:4096 -keyout /root/.config/Duplicati/ssl/key.pem -out /root/.config/Duplicati/ssl/cert.pem -sha256 -days 3650 -nodes -subj "/CN=nl-1.srv.example.net" # Replace "nl-1.srv.example.net" with your server hostname sudo openssl pkcs12 -export -out /root/.config/Duplicati/ssl/nl-1.srv.example.net.pfx -inkey /root/.config/Duplicati/ssl/key.pem -in /root/.config/Duplicati/ssl/cert.pem -passout pass: -
Open
/etc/default/duplicatiand replace the entire line ofDAEMON_OPTS=…withDAEMON_OPTS="--webservice-interface=any --webservice-port=8200 --webservice-allowed-hostnames=nl-1.srv.example.net --webservice-sslcertificatefile=/root/.config/Duplicati/ssl/nl-1.srv.example.net.pfx"Replace both
nl-1.srv.example.netwith your server hostname.
-
-
-
Once started as per the Duplicati 2 User's Manual's last step, you can now access the Duplicati web UI at
https://nl-1.srv.example.net/duplicati/orhttps://nl-1.srv.example.net:8200, depending on your setup. -
During the "First Run Setup," you'll be asked if you want to set a password. It's important to choose a strong password; for example, I use a 32-character randomly generated password stored in my password manager.
-
On the "Settings" page, you might want to change "Anonymous usage reports" to
Errors and crashesor evenNone / disabled. -
Add a new backup, setting the following fields on the configuration tabs:
-
"General" tab:
- Name:
Backblaze Backup - Passphrase - set up a good encryption password - I'd use a 64 characters random string
- Name:
-
"Destination" tab
- Storage Type:
B2 Cloud Storage - Bucket name: the one you created earlier (e.g.,
acme-nl1srvexamplenet-backup) - B2 Application ID: the
keyIDthat you copied earlier. - B2 Application Key: the
applicationKeythat you copied earlier.
Now test your connection, and continue to the next step if it's successful.
- Storage Type:
-
"Source Data" tab
- Source data: choose what folders you want to backup, I usually choose
/etc,/home,/root,/var/spool/cron - Filters: expand
Filters, then click on the three dots > "Edit as text"
This is the list I use, feel free to modify according to your needs:
-*.log -access-logs/* -*/backupbuddy_backups/* -*/cache/smarty/* -.cagefs -.cagefs* -*/com_akeeba/backup/* -*/core.[0-9]* -.cpan -.cpanel/caches -.cpanel/datastore -.cpanel/*.sock -.cpcpan -*/error_log -logs/* -tmp/* -.MirrorSearch -public_ftp/* -public_html/cache/* -softaculous_backups/* -.sqmailattach -*/var/amasty_fpc/* -*/var/backups/* -*/var/cache/* -*/var/debug/* -*/var/export/* -*/var/import/* -*/var/log/* -*/var/report/* -*/var/session/* -*/var/tmp/* -*/wp-content/cache/* -*/wp-content/uploads/wpcf7_captcha/* -*/wp-content/widget-cache/* -*.wpress -*/wptsc-cachedir/* -*/.wysiwygPro_* -/root/.config/Duplicati/ - Source data: choose what folders you want to backup, I usually choose
-
"Schedule" tab
- Choose a time of day for the backups – usually when your server is less loaded (e.g., 2 am)
-
"Options" tab
- Backup retention:
Custom backup retention - Configure the custom retention field, e.g.,
30D:1D,1Y:1Mif you want to keep one backup for each of the next 30 days, and one for each of the next 12 months
- Backup retention:
-
-
"Run now" your backup and monitor it from time to time. If it stops, re-run until it completes successfully (e.g., if a connectivity issue with Backblaze B2 occurs, it will result in an error. Re-running the backup will resume the progress from where it stopped).
-
Test and verify that the restoration process works!
Backing up your Linux server with Duplicati and Backblaze B2 is straightforward and cost-effective. Follow this guide to keep your data safe and easily restorable. As the saying goes, "An ounce of prevention is worth a pound of cure," and sometimes it's even too late for a cure, so be prepared!
Want more ideas, insights, or practical guides? Subscribe here for more tips and tricks: